


My Exciting Journey: Building The Perfect Home Recording Booth For Voice Overs-Part Four (Adhesive & Mayhem)
- Alexander Evley
- Jun 25, 2025
- 3 min read

Back to building my little recording booth!
Let me preface this instalment by saying that plasterboard dust has a remarkable talent for clinging to one's scalp. Three shampoos later and my hair still smelled like a construction site. Note to self: wear a cap next time—or embrace the inevitable and shave it all off...again.
This week was all about going deeper into soundproofing, scraping, sanding, and… sheep’s wool. You heard that right.
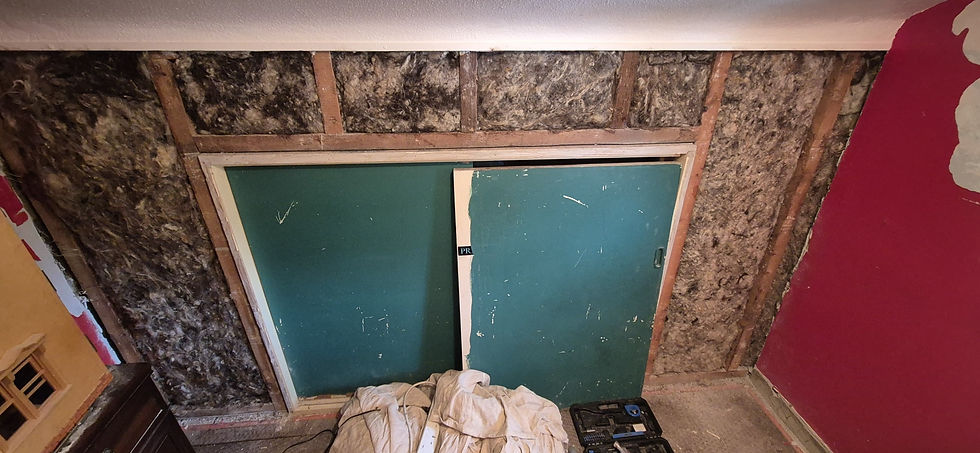
I started by packing the wall cavities with repurposed sheep’s wool insulation, courtesy of Butternut Box dog food deliveries. I touched on this in an earlier blog, but it has many recyclable uses, and this is one of them! Each pocket took around three to five layers, glued with adhesive spray between each one. A fiddly process, but incredibly satisfying seeing those walls start to feel “dense.” I ended up with very woolly hands and deeply regretted not wearing gloves for this process.

Next came the Great Paint Removal Odyssey. I stripped all the paint from the walls, except one stubborn column, using wallpaper stripper to loosen up the old layers hidden underneath. What followed was a full-body workout in the form of relentless scraping until my arms gave in. Who needs a gym membership?
I filled every lingering rawlplug hole with polyfiller and then, once it was all dry, brought out the orbital sander to smooth everything down. That also helped clear the final traces of wallpaper glue, leaving me with clean, ready-to-go surfaces.


Then came the exciting delivery run: I picked up the dB Soundboard panels and acoustic plasterboard, thanks to The Soundproofing Shop (https://soundproofingshop.com/). They were just the right size to fit into mum’s classic VW camper van. Huge thanks to the guys at the shop who not only helped me load everything but also recommended a top-quality acoustic sealant as it’s a game-changer for eliminating air gaps and preventing flanking sound.
Mum and I made another pit stop at B&Q for some last-minute essentials: tools, timber, and decorating stuff, before heading home.
Once back, I realised I didn’t have the right tools for cutting the dB Soundboard. So… enter: Stanley knife, raw determination, and a hefty dose of elbow grease.
Managed to tackle the two largest panels solo before my partner arrived and helped me get across the finish line.


Each panel was sealed around the edges with the new acoustic sealant (highly satisfying, actually), and I called it a day before starting the plasterboarding. Sometimes the smartest move is knowing when to stop and save energy for the next round.
If you want to know more about the products I'm using, carry on reading below!
About the dB Soundboard:
I’ve opted for the DBX PRO Acoustic Board - a UK-made, high-performance soundproofing panel that’s punching well above its weight (literally 22kg/m²). I don't know exactly what it's made from but what I can tell you is it's messy to cut with the amount of fine sand that it is filled with...by the end of the cutting process, I may as well have turned the room into a beach flooring.
But I digress.
On its own, it cuts airborne noise by up to 39dB, and when paired with acoustic plasterboard, the overall sound insulation skyrockets. It also knocks down impact noise by 35dB when tested on a concrete floor which is pretty impressive stuff.
At just 15mm thick, it’s ideal for tight spaces, like those that I'm working with, and it works brilliantly across walls, floors, ceilings, studios, and cinema setups. Plus, it's breathable, plays nicely with underfloor heating, and delivers a solid, ready-to-finish surface.
About the acoustic plasterboard:
As part of the build, I’ve gone for Knauf Soundshield Plus - a 12.5mm thick, high-mass plasterboard designed specifically for serious sound reduction and fire resistance. I had originally gone for the 15mm thickness version, however the store didn't have them in stock and it would have cost an extra £80 delivery fee, which felt like money well wasted.
The plasterboard is a high mass, tuned core plasterboard with a blue face. It is great for lining walls and partitions where keeping noise in, or out, is key.
At 11.5kg per square metre and covering 2.88m² per board, its weight does the heavy lifting when it comes to blocking airborne sound. Plus, it meets severe duty ratings, making it great for studio-level builds like mine.


Comments